Title here
Summary here
The version 0.5.0 of the Digital Twin library introduces significant enhancements focused on Digital Twin Resources and a Management Interface for runtime configuration and management. These new features empower developers to create more dynamic, adaptable, and interactive Digital Twins that can be tailored to specific application needs.
In addition, in order to keep the core of the library independent from external dependencies, WLDT introduces a flexible and configurable logging layer. This design allows developers to extend and integrate the logging system according to the specific requirements of their projects, without being tied to any particular logging framework. The logging API interfaces and methods are inspired by popular libraries such as Log4j and Logback, making it easier for developers to integrate WLDT logging with their preferred solutions.
Furthermore, this release includes various bug fixes, performance improvements, and documentation updates to enhance the overall user experience and reliability of the library.
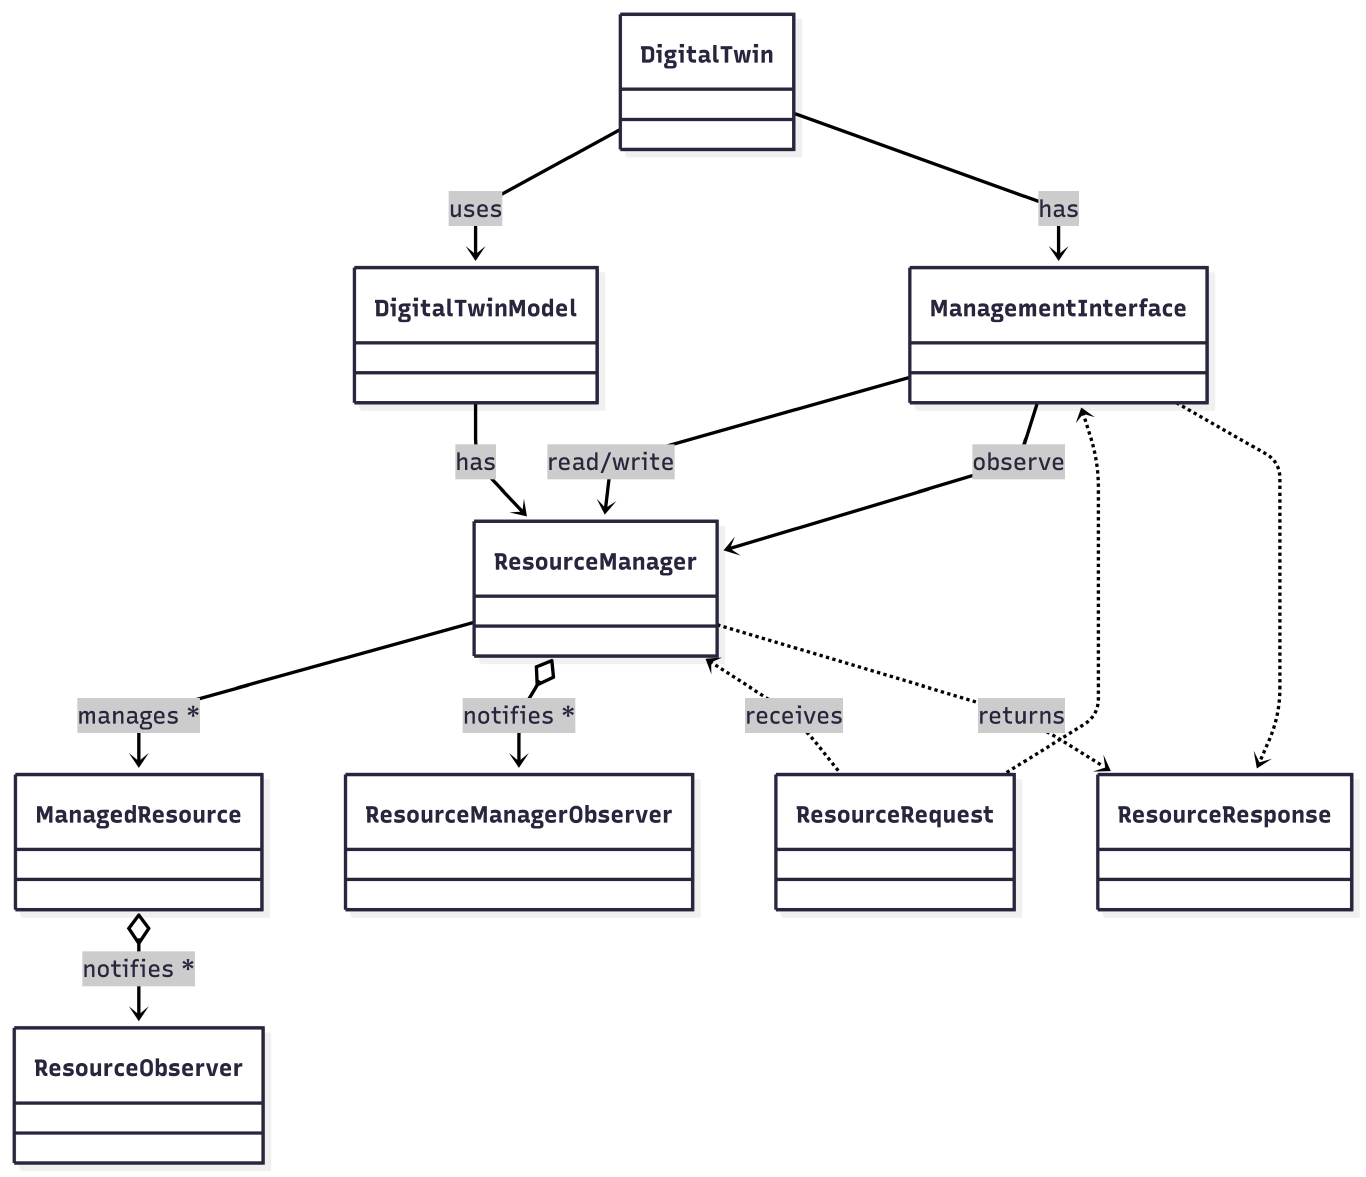
New classes have been introduced to enable a flexible, runtime-manageable resource model within each instance of a Digital Twin. These abstractions are designed to support extensibility, configurability, and interoperability across both internal DT logic and external applications.
⚠️ Developer Notice: The core of the Digital Twin library only provides an abstract interface for the Management Interface. It is the responsibility of the developer to implement the actual logic for exposing and interacting with resources through this interface (e.g., via REST, MQTT, gRPC, etc.). This design ensures modularity and flexibility, allowing integration with various protocols and platforms tailored to specific application requirements, without increasing the size or complexity of the core library or introducing strong dependencies on external libraries.
A Digital Twin that monitors a physical asset with temperature sensors may need to detect thermal anomalies based on configurable thresholds.
| Resource Name | Type | Purpose |
|---|---|---|
target_value | double | Maximum allowed temperature before triggering an alert |
n | int | Number of consecutive samples required for anomaly detection |
time_window | long | Time duration (e.g., in seconds) over which n samples are evaluated |
n samples in the last time_window exceed target_value, a temperature-alert-event is generated.In a Digital Twin for an industrial motor, speed regulation may depend on a maximum speed constraint that can vary based on maintenance schedules or environmental conditions.
| Resource Name | Type | Purpose |
|---|---|---|
max_speed_rpm | int | Maximum allowed speed in RPM |
emergency_stop_delay | long | Delay before activating safety shutdown after a violation |
speed_adjust_factor | double | Modifier applied to current speed under certain conditions |
max_speed_rpm is exceeded, and speed is not reduced within emergency_stop_delay, the DT issues a safety-shutdown-command.speed_adjust_factor is used during load balancing or environmental compensation.The following classes define the foundation of the Digital Twin resource management framework. They support runtime configuration, monitoring, and control of internal and external components through a consistent and extensible model. These abstractions are designed to support both the internal logic of the Digital Twin and external applications interacting through a Management Interface.
The schematic description of the new introduced classes is structured as follows:
ManagedResource class represents an abstract, generic resource that can be configured and managed at runtime. Each resource is uniquely identified and carries a type and name. It encapsulates the actual resource object, such as a configuration parameter or operational constraint. This class provides a standard interface for Create, Read, Update, and Delete (CRUD) operations. Additionally, it supports the registration of observers, allowing other components or systems to receive notifications when the resource is modified. Designed to be extended, ManagedResource allows developers to implement specific resource types suited to their application. It can be used directly by the Digital Twin’s internal logic or accessed externally via the Management Interface. The developer can internally define sub-resource of the original resource (e.g., a specific key-value mapping in a dictionary) and the access of sub-resources can be handled by the ResourceRequest and the associated ResourceResponse.ResourceManager serves as the central registry and orchestrator for all managed resources in a Digital Twin instance. It is responsible for managing the entire resource lifecycle, including creation, lookup, update, and removal. This class provides an API through which both the internal logic of the Digital Twin and external clients (via the Management Interface) can consistently interact with resources. It ensures that resource access is coordinated and properly controlled, supporting integrity and safe concurrent operations. The ResourceManager plays a key role in decoupling the internal components from external systems, simplifying integration and improving maintainability. The ResourceManager has been added to the core DigitalTwin and DigitalTwinModel classes in order to be properly initialized and the make is usable through the DT instance and in particular in the shadowingFunction and it is accessible on a DigitalTwin instance through the method digitalTwin.getResourceManager().ResourceRequest class encapsulates the details required to perform an operation on a managed resource. It typically includes a target resource identifier, optional sub-resource identifiers (useful for hierarchical or composite resources), and a payload carrying the specific data for the operation. By abstracting the invocation of resource operations from their implementation, this class enables flexible and extensible workflows that support different transport or protocol layers, such as REST or Pub/Sub. The library currently supports requests targeting a specific resource and one level of sub-resources. To handle deeper hierarchies of sub-resources, developers will need to extend the existing library functionalities with custom implementations.ResourceResponse class represents the result of a resource operation. It contains the outcome of the requested action, including any output data and status information. If an error occurred during the operation, relevant error details are also included. This class ensures a consistent way to communicate results, whether the request originates from internal Digital Twin components or external systems.ManagementInterface defines the external API through which runtime resource operations can be performed by remote applications or tools. It exposes methods or endpoints for creating, reading, updating, and deleting resources, as well as querying their current status and subscribing to events. This interface acts as a bridge between the Digital Twin’s internal resource model and external systems, enabling dynamic and secure interaction with configurable parameters and operational data. The core library only defines the abstract contract for this interface. Developers must provide a concrete implementation, which can be based on any desired communication protocol such as REST, MQTT, or gRPC, depending on system requirements. The ManagementInterface can be set on the DT through the method setManagementInterface(managementInterface) on the DigitalTwin instance.These core classes establish a robust and extensible architecture for runtime resource management. They provide a unified model that supports internal orchestration and external integration. By promoting clear separation of concerns, consistency in interactions, and modular design, they make the Digital Twin framework more adaptable, maintainable, and suitable for a wide range of IoT and IIoT applications.
This section demonstrates how to set up a DigitalTwin with ResourceManager custom ManagedResource(s) and a dedicated testing ManagementInterface to register a resource, and perform read operations using ResourceRequest and ResourceResponse.
Start by creating a Custom ManagedResource called as DictionaryManagedResource to handle DT’s configuration as a basic key-value dictionary:
import java.util.HashMap;
import java.util.Map;

public class DictionaryManagedResource extends ManagedResource<Map<String, Object>, Object, Object> {

    public DictionaryManagedResource(String id, String type, String name, Map<String, Object> dictionary) {
        super(id, type, name, dictionary);
    }

    public DictionaryManagedResource(String id, String type, String name) {
        super(id, type, name, new HashMap<>());
    }

    @Override
    protected ResourceResponse<Object> onCreate(ResourceRequest<Object> resourceRequest) {
        // In this case the creation means adding a new key-value pair to the dictionary
        // so we have to take the sub-resource ID as the key and the content as the value since
        // the resource ID is the ID of the dictionary itself.
        if (resourceRequest == null ||
                resourceRequest.getResourceId() == null ||
                resourceRequest.getContent() == null ||
                resourceRequest.getSubResourceId().isEmpty())
            return new ResourceResponse<Object>(400, "Invalid Resource Request!");

        String key = resourceRequest.getSubResourceId();
        Object value = resourceRequest.getContent();
        resource.put(key, value);
        return new ResourceResponse<Object>(resourceRequest.getResourceId(), key, value, null);
    }

    @Override
    protected ResourceResponse<Object> onRead(ResourceRequest<Object> resourceRequest) {

        // Validate the resource request
        if(resourceRequest == null || resourceRequest.getResourceId() == null)
            return new ResourceResponse<Object>(400, "Invalid Resource Request!");

        // Validate resource id to ensure it is not empty and matches the managed resource ID
        if(resourceRequest.getResourceId().isEmpty() || !resourceRequest.getResourceId().equals(this.getId()))
            return new ResourceResponse<Object>(400, "Resource ID cannot be empty or does not match the managed resource ID!");

        // Check if the request is for a sub-resource associated to a key in the dictionary
        if (resourceRequest.getSubResourceId() != null && !resourceRequest.getSubResourceId().isEmpty()) {
            String subResourceKey = resourceRequest.getSubResourceId();
            Object subResourceValue = resource.get(subResourceKey);
            return new ResourceResponse<Object>(this.getId(), subResourceKey, subResourceValue, null);
        }
        // If no sub-resource is specified, return the entire dictionary
        else {
            return new ResourceResponse<Object>(this.getId(), resource, null);
        }

    }

    @Override
    protected ResourceResponse<Object> onUpdate(ResourceRequest<Object> resourceRequest) {
        // The key is the sub-resource ID and the value is the content of the request.
        String key = resourceRequest.getSubResourceId();
        Object value = resourceRequest.getContent();
        resource.put(key, value);
        return new ResourceResponse<Object>(resourceRequest.getResourceId(), value, null);
    }

    @Override
    protected ResourceResponse<Object> onDelete(ResourceRequest<Object> resourceRequest) {
        // The key is the sub-resource ID and the value is the content of the request.
        String key = resourceRequest.getSubResourceId();
        Object value = resource.remove(key);
        return new ResourceResponse<Object>(resourceRequest.getResourceId(), value, null);
    }
}
In this case, the resource is represented by a dictionary implemented using a HashMap. The main resource corresponds to the map itself, while sub-resources refer to the individual first-level entries within the map. Each sub-resource can be accessed using a ResourceRequest by specifying the appropriate string key. The library currently supports requests for a specific resource and a single level of sub-resources. To manage deeper hierarchical structures, developers will need to extend the library with custom implementations.
Create the DigitalTwinEngine and your DigitalTwin. You also need to register physical and digital adapters, and configure your custom DictionaryManagedResource instance previously created.
⚠️ The following code is just an example to make the overall example readable but it should be customized according to your Digital Twin implementation and available physical and digital adapters.
// Create the Digital Twin Engine
DigitalTwinEngine digitalTwinEngine = new DigitalTwinEngine();

// Create the new Digital Twin with our Shadowing Function
DigitalTwin digitalTwin = new DigitalTwin(TEST_DIGITAL_TWIN_ID, new DemoShadowingFunction());

// Physical Adapter with Configuration
digitalTwin.addPhysicalAdapter(
        new DemoPhysicalAdapter(
                "test-physical-adapter",
                new DemoPhysicalAdapterConfiguration()
                ));

// Digital Adapter with Configuration
digitalTwin.addDigitalAdapter(
        new DemoDigitalAdapter(
                "test-digital-adapter",
                new DemoDigitalAdapterConfiguration())
);
Now we can initialize our custom ManagedResource called as DictionaryManagedResource to handle DT’s configuration as a basic key-value dictionary:
// Create our test resource as a Map with configuration properties
Map<String, Object> configurationProperties = new HashMap<>();
configurationProperties.put(PROPERTY_NAME_1, PROPERTY_VALUE_1);
configurationProperties.put(PROPERTY_NAME_2, PROPERTY_VALUE_2);
configurationProperties.put(PROPERTY_NAME_3, PROPERTY_VALUE_3);

// Create a new Managed Resource to be used by the Digital Twin and managed by the Management Interface
DictionaryManagedResource dictionaryManagedResource = new DictionaryManagedResource(
        RESOURCE_ID,
        RESOURCE_TYPE,
        RESOURCE_NAME,
        configurationProperties);
Once we have a resource we can the following methods provided by the ResourceManager:
void addResource(ManagedResource<?, ?, ?> resource): Adds a resource to the manager and notifies observers.void removeResource(ManagedResource<?, ?, ?> resource): Removes a resource by instance and notifies observers.void removeResource(String resourceId): Removes a resource by its ID and notifies observers.void updateResource(ManagedResource<?, ?, ?> resource): Updates an existing resource and notifies observers.void clearResourceList(): Removes all resources and notifies observers.Optional<ManagedResource<?, ?, ?>> getResourceById(String resourceId): Retrieves a resource by its ID.List<ManagedResource<?, ?, ?>> getResourceList(): Returns a list of all managed resources.boolean containsResource(String resourceId): Checks if a resource with the given ID existsTo add a new resource to the we can use the following code:
// Add a Managed Resource to the Digital Twin
digitalTwin.getResourceManager().addResource(dictionaryManagedResource);
When the resource has been added to the ResourceManager it can be accessed for example from the ShadowingFunctionto be used within the digitalization processes of the Digital Twin:
// Check if the ResourceManager is initialized and contains the expected resource
if (this.resourceManager != null && this.resourceManager.containsResource(RESOURCE_ID)) {

    // Retrieve the resource by ID
    Optional<ManagedResource<?, ?, ?>> optionalResource = this.resourceManager.getResourceById(RESOURCE_ID);

    // Check if the resource is present and is an instance of DictionaryManagedResource
    if (optionalResource.isPresent() && optionalResource.get() instanceof DictionaryManagedResource) {

        // Cast the resource to DictionaryManagedResource
        DictionaryManagedResource dictionaryResource = (DictionaryManagedResource) optionalResource.get();

        // Access the value of the 'test' property in the resource
        Object testPropertyValue = dictionaryResource.getResource().get("test");

        // Log the retrieved value
        System.out.println("ShadowingFunction - Resource Property 'test' Value: " + testPropertyValue);
    }
} else
	logger.error("ResourceManager is null or empty. Cannot read the Resource {}.", ManagementInterfaceTester.RESOURCE_ID);
At this stage the resource will be available within the DT instance (e.g., in the Shadowing function) but not to external application since no ManagementInterface has been adde to the DT instance.
To expose the configurable resource managed by the Digital Twin (DT), we define a custom implementation of the ManagementInterface—called DemoManagementInterface. This implementation is designed for demonstration and explanation purposes, and deliberately avoids dependencies on specific networking libraries. Instead, it emulates the behavior of a network interface, allowing developers to test the logic behind ResourceRequest and ResourceResponse.
In a real deployment, it is up to the developer to create a concrete implementation of the ManagementInterface, using the preferred communication protocol—such as HTTP for RESTful APIs, or publish/subscribe mechanisms like MQTT.
The demo interface will be as following:
import it.wldt.exception.WldtManagedResourceException;
import it.wldt.exception.WldtManagementInterfaceException;
import org.slf4j.Logger;
import org.slf4j.LoggerFactory;
import java.util.List;
import java.util.Optional;

public class DemoManagementInterface extends ManagementInterface {

    private static final Logger logger = LoggerFactory.getLogger(DemoManagementInterface.class);

    // Flag to indicate if the management interface has been started
    private boolean isStarted = false;

    // Constants for request types
    public static final String READ_REQUEST = "READ";
    public static final String CREATE_REQUEST = "CREATE";
    public static final String UPDATE_REQUEST = "UPDATE";
    public static final String DELETE_REQUEST = "DELETE";

    @Override
    protected void onStart(List<ManagedResource<?, ?, ?>> resources) {

        // Set the started flag to true
        this.isStarted = true;

        logger.info("DemoManagementInterface started with {} resources:", resources.size());

        for (ManagedResource<?, ?, ?> resource : resources) {
            logger.info("Managed Resource: {}", resource.getId());
        }
    }

    @Override
    protected void onStop() {
        logger.info("DemoManagementInterface stopped.");
    }

    @Override
    protected void onResourceAdded(ManagedResource<?, ?, ?> resource) {
        logger.info("Resource added: {}", resource.getId());
    }

    @Override
    protected void onResourceUpdated(ManagedResource<?, ?, ?> resource) {
        logger.info("Resource updated: {}", resource.getId());
    }

    @Override
    protected void onResourceRemoved(ManagedResource<?, ?, ?> resource) {
        logger.info("Resource removed: {}", resource.getId());
    }

    /**
     * Validates the ResourceRequest and retrieves the associated ManagedResource
     * form the ResourceManager.
     *
     * @param resourceRequest the resource request
     * @return an Optional containing the ManagedResource if found, or empty if not found
     * @throws WldtManagementInterfaceException if the management interface is not started or the request is invalid
     * @throws WldtManagedResourceException if the resource is not found
     */    private Optional<DictionaryManagedResource> validateAndLoadRequest(ResourceRequest<?> resourceRequest) throws WldtManagementInterfaceException, WldtManagedResourceException {

        if (!this.isStarted) {
            logger.error("DemoManagementInterface is not started. Cannot access resource.");
            throw new WldtManagementInterfaceException("Management interface not started.");
        }
        if (resourceRequest == null || resourceRequest.getResourceId() == null || resourceRequest.getResourceId().isEmpty()) {
            logger.error("Error handling Null Request! Received request: {}", resourceRequest);
            throw new WldtManagedResourceException("Invalid resource request.");
        }

        // Get the resource ID from the ResourceRequest
        String resourceId = resourceRequest.getResourceId();
        logger.info("Accessing resource with ID: {}", resourceId);

        // Retrieve the ManagedResource from the ResourceManager using the resource ID
        Optional<ManagedResource<?, ?, ?>> resourceOpt = this.resourceManager.getResourceById(resourceId);

        // Check if the ManagedResource is present
        if(resourceOpt.isPresent()) {

            // Retrieve the ManagedResource from the Optional
            ManagedResource<?, ?, ?> retrievedManagedResource = resourceOpt.get();

            // Check the instance of ManagedResource to ensure it is compatible with the request
            if (!(retrievedManagedResource instanceof DictionaryManagedResource))
                throw new WldtManagedResourceException("Loaded resource has a wrong type: " + retrievedManagedResource.getClass().getName());

            // Cast and return the ManagedResource to DictionaryManagedResource
            return Optional.of((DictionaryManagedResource) retrievedManagedResource);
        }
        else
            // Resource not found, return an empty Optional
            return Optional.empty();
    }

    /**
     * Emulates an incoming request to the management interface.
     * This method validates the request, retrieves the ManagedResource, and performs the requested operation (read, create, update, delete).
     * It returns an Optional containing the ResourceResponse if successful, or an error response if the request fails or the resource is not found.
	 * @param requestType the type of request (READ, CREATE, UPDATE, DELETE)
     * @param resourceRequest the resource request containing the resource ID and sub-resource ID
     * @return an Optional containing the ResourceResponse if successful, or an error response if the request fails or the resource is not found
     */    public Optional<ResourceResponse<?>> emulateIncomingRequest(String requestType, ResourceRequest<?> resourceRequest) {

        try{

            // Validate the ResourceRequest and retrieve the ManagedResource
            Optional<DictionaryManagedResource> optionalManagedResource = validateAndLoadRequest(resourceRequest);

            // Check if the ManagedResource is present
            if(optionalManagedResource.isPresent()) {

                // Cast the ManagedResource to DictionaryManagedResource
                DictionaryManagedResource managedResource = optionalManagedResource.get();

                // Prepare the request
                ResourceRequest<Object> newRequest = new ResourceRequest<>(
                        resourceRequest.getResourceId(),
                        resourceRequest.getSubResourceId(),
                        resourceRequest.getContent(),
                        resourceRequest.getMetadata());

                if(requestType.equals(READ_REQUEST))
                    // Read the resource using the ManagedResource's read method and return the response
                    return Optional.ofNullable(managedResource.read(newRequest));
                else if(requestType.equals(CREATE_REQUEST))
                    // Create the resource using the ManagedResource's create method and return the response
                    return Optional.ofNullable(managedResource.create(newRequest)); // Assuming getData() returns the resource data
                else if(requestType.equals(UPDATE_REQUEST))
                    // Update the resource using the ManagedResource's update method and return the response
                    return Optional.ofNullable(managedResource.update(newRequest));
                else if(requestType.equals(DELETE_REQUEST))
                    // Delete the resource using the ManagedResource's delete method and return the response
                    return Optional.ofNullable(managedResource.delete(newRequest));
                else {
                    logger.error("Unknown request type: {}", requestType);
                    return Optional.of(new ResourceResponse<>(400, "Unknown request type: " + requestType));
                }

            } else {
                // Resource not found, return a 404 response
                return Optional.of(new ResourceResponse<>(404, "Resource not found with ID: " + resourceRequest.getResourceId()));
            }

        }catch (Exception e){
            e.printStackTrace();
            logger.error("Error reading resource: {}", e.getMessage());
            return Optional.of(new ResourceResponse<>(400, "Error Managing the Resource Request: " + e.getMessage()));
        }
    }

}
At this point, only the read resource method has been implemented. However, we can define and add additional methods to the interface later. In the meantime, we can integrate the interface into the Digital Twin and test its core functionalities.
Now that we’ve defined and implemented our ManagementInterface—named DemoManagementInterface—we can initialize it, attach it to the Digital Twin, and then start the Twin within the Digital Twin Engine.
Initialize and attach the DemoManagementInterface:
// Create a new Management Interface
managementInterface = new DemoManagementInterface();

// Add the Management Interface to the Digital Twin
digitalTwin.setManagementInterface(managementInterface);
Register the Digital Twin with the engine and start it:
// Add the Twin to the Engine
digitalTwinEngine.addDigitalTwin(digitalTwin);

// Start the Digital Twin
digitalTwinEngine.startDigitalTwin(TEST_DIGITAL_TWIN_ID);
Now we can test the DemoManagementInterface that we have created to read a target resource (the DictionaryManagedResource instance) managed by the DT creating a ResourceRequest and accessing the ResourceResponse.
The ResourceRequest<T> class is a generic container used to encapsulate all the information needed to perform an operation on a managed resource within the Digital Twin framework. It is designed to be flexible and extensible, supporting a wide range of resource types and operations.
Key Features:
content field can hold any type of object relevant to the resource operation, making the request adaptable to different use cases.resourceId and optional subResourceId fields uniquely identify the target resource and, if needed, a sub-resource.metadata map allows attaching additional contextual information to the request, such as operation parameters or user data.On the other hand, the ResourceResponse<T> class is a generic container used to encapsulate the result of an operation performed on a managed resource in the Digital Twin framework. It standardizes how responses, including both successful results and errors, are communicated back to callers.
Key Features:
resource field can hold any type of object representing the result of the operation.resourceId and optional subResourceId fields identify the resource and sub-resource related to the response.metadata map allows attaching additional contextual information to the response.isError, errorCode, and errorMessage fields provide a uniform way to report errors.Now we try the interaction with the defined DemoManagementInterface to access a target resource:
// Create the Resource Request to read the Resource from the Interface
ResourceRequest<String> resourceRequest = new ResourceRequest<>(RESOURCE_ID);

// Test reading a resource from the Management Interface
Optional<ResourceResponse<?>> resourceResponse = managementInterface.emulateReadResource(resourceRequest);

// Check if the Resource Response is present
if (resourceResponse.isPresent()) {
    ResourceResponse<?> response = resourceResponse.get();
    logger.info("Resource Response: {}", response);
    logger.info("Resource Content: {}", response.getResource());
} else {
    logger.error("Resource Response is not present");
}
To access the value of an individual sub-resource within a DictionaryManagedResource, you can use the same ResourceRequest type, including an additional parameter that specifies the sub-resource’s ID.
// Create the Resource Request to read the Resource from the Interface
ResourceRequest<String> resourceRequest = new ResourceRequest<>(RESOURCE_ID, PROPERTY_NAME_1);

// Test reading a resource from the Management Interface
Optional<ResourceResponse<?>> resourceResponse = managementInterface.emulateReadResource(resourceRequest);

// Check if the Resource Response is present
if (resourceResponse.isPresent()) {
    ResourceResponse<?> response = resourceResponse.get();
    logger.info("Resource Response: {}", response);
    logger.info("Sub-Resource Content: {}", response.getResource());
} else {
    logger.error("Resource Response is not present");
}
Considering the target demo resource DictionaryManagedResource we can also add the DemoManagementInterface to create a new resource. In this case since it is a resource mapping a Dictionary the creation will be associated to the creation of a new sub-resource to the dictionary.
In this configuration the associated code to emulate the create operation on the DemoManagementInterface is:
// Create the Resource Request to create a Resource from the Interface
// Since the main resource is a Map and we want to create a new property we have to set the sub-resource ID as
// the new property name that we want to add or update
ResourceRequest<String> resourceRequest = new ResourceRequest<>(RESOURCE_ID, PROPERTY_NAME_4);

// Now we set the content of the request to the new value we want to set for the new property
resourceRequest.setContent(PROPERTY_VALUE_4);

// Test reading a resource from the Management Interface
Optional<ResourceResponse<?>> resourceResponseOptional = managementInterface.emulateIncomingRequest(DemoManagementInterface.CREATE_REQUEST, resourceRequest);

// Check if the Resource Response is present
if (resourceResponseOptional.isPresent()) {
    ResourceResponse<?> response = resourceResponseOptional.get();
    logger.info("Resource Response: {}", response);
    logger.info("Resource Content: {}", response.getResource());
} else {
    logger.error("Resource Response is not present");
}
The same approach can be applied to Update and Delete operations through the DemoManagementInterface. However, it’s important to note that these actions only affect the dictionary values (i.e., the sub-resources), not the main resource (the dictionary) itself. This behavior reflects a design choice where the main resource is considered non-deletable via the management interface, representing a resource managed directly by the Digital Twin. Developers can implement alternative behaviors based on their specific requirements.
The ResourceManager supports an observation mechanism that allows external components to be notified about changes in the managed resources. This is achieved through the IResourceManagerObserver interface and the observer management methods in the ResourceManager class.
The IResourceManagerObserver interface defines the contract for observers that wish to receive notifications about resource events in the ResourceManager. Implementers of this interface can react to resource additions, removals, updates, and when the resource list is cleared through the following methods:
onManagerResourceAdded(String resourceId): This method is called when a new resource is added to the management interface.onManagerResourceRemoved(String resourceId): This method is called when a resource is removed from the management interface.onManagerResourceUpdated(String resourceId): This method is called when a resource is updated on the resource manageronManagerResourceListCleared(): This method is called when the resource list is cleared.By implementing this interface, external modules can subscribe to resource lifecycle events and synchronize their state or trigger custom logic accordingly. The ResourceManager class provides methods to manage observers:
addObserver(IResourceManagerObserver observer): Registers an observer to receive notifications about resource changes. Observers are stored in an internal list and will be notified on relevant events.removeObserver(IResourceManagerObserver observer): Unregisters an observer, stopping further notifications to it.Usage Example:
// Add an Observer to the Resource Manager
digitalTwin.getResourceManager().addObserver(new IResourceManagerObserver() {
    @Override
    public void onManagerResourceAdded(String resourceId) {
        System.out.println("Resource added: " + resourceId);
    }

    @Override
    public void onManagerResourceRemoved(String resourceId) {
	    System.out.println("Resource removed: " + resourceId);
    }

    @Override
    public void onManagerResourceUpdated(String resourceId) {
		System.out.println("Resource updated: " + resourceId);
    }

    @Override
    public void onManagerResourceListCleared() {
		System.out.println("Resource list cleared ...");
    }
});
Note: This observation mechanism is internal to the Digital Twin and operates at the
ResourceManagerlevel, not on individual resource changes. Observations and callbacks for actions originating from theManagementInterfacedirectly on singleManagedResourceare handled separately, as described in the next section.
To monitor changes or actions on a specific ManagedResource, you can implement the IResourceObserver interface and use the addObserver() and removeObserver() methods available in the ManagedResource class. This enables you to receive notifications for create, read, update, and delete operations performed on that resource.
Method provided by the interface IResourceObserver are:
void onCreate(String resourceId, String subResourceId): Called when a resource or subresource is created.resourceId: The unique identifier of the main resource.subResourceId: The unique identifier of the subresource created under the main resource. Can be null or empty if the event refers to the main resource itself.void onUpdate(String resourceId, String subResourceId): Called when a resource or subresource is updated.resourceId: The unique identifier of the main resource.subResourceId: The unique identifier of the subresource updated. Can be null or empty if the event refers to the main resource itself.void onDelete(String resourceId, String subResourceId): Called when a resource or subresource is deleted.resourceId: The unique identifier of the main resource.subResourceId: The unique identifier of the subresource deleted. Can be null or empty if the event refers to the main resource itself.Note: The
resourceIdalways refers to the main or parent resource while thesubResourceIdrefers to a nested subresource inside the main resource. If the operation targets the main resource directly,subResourceIdmay benullor an empty string.
The example below demonstrates how to register an observer for a target resource and handle callbacks triggered by changes initiated through the ManagementInterface. This mechanism allows Digital Twin developers to react to resource updates and synchronize behavior accordingly.
// Read the resource from the Resource Manager
Optional<ManagedResource<?, ?, ?>> resourceOptional = digitalTwin.getResourceManager().getResourceById(RESOURCE_ID);

// Check with instance of if the Resource is of type DictionaryManagedResource
if (resourceOptional.isPresent() && resourceOptional.get() instanceof DictionaryManagedResource) {
    // Cast the Resource to DictionaryManagedResource
    DictionaryManagedResource dictionaryManagedResource = (DictionaryManagedResource) resourceOptional.get();

    // Add a callback to the Managed Resource
    dictionaryManagedResource.addObserver(new IResourceObserver() {
        @Override
        public void onCreate(String resourceId, String subResourceId) {
           System.out.println("Create Callback on Resource: " + resourceId + ", SubResource: " + subResourceId);
        }

        @Override
        public void onUpdate(String resourceId, String subResourceId) {
            System.out.println("Update Callback on Resource: " + resourceId + ", SubResource: " + subResourceId);
        }

        @Override
        public void onDelete(String resourceId, String subResourceId) {
            System.out.println("Delete Callback on Resource: " + resourceId + ", SubResource: " + subResourceId);
        }
    });
}
else
    logger.error("Resource is not of type DictionaryManagedResource");
In order to keep the core of the library independent from external dependencies, WLDT introduces a flexible and configurable logging layer.
This design allows developers to extend and integrate the logging system according to the specific requirements of their projects,
without being tied to any particular logging framework. The logging API interfaces and methods are inspired by popular libraries such as Log4j
and Logback, making it easier for developers to integrate WLDT logging with their preferred solutions.
Furthermore, the library provides a default implementation that uses classic Java System.out.* output, ensuring basic logging
functionality is available out-of-the-box for immediate usability. This approach enables both quick adoption and
advanced customization as needed.
The WLDT logging layer provides a flexible and extensible way to handle logging within your digital twin applications.
It’s designed to allow developers to easily switch between different logging implementations without modifying core application code.
The core components of the WLDT logging layer are:
WldtLogger: An interface defining the standard logging methods (e.g., info, debug, error).WldtLoggerFactory: An interface for creating WldtLogger instances.WldtLoggerProvider: A utility class that provides a static method to get WldtLogger instances and allows setting a custom WldtLoggerFactory.WldtDefaultLogger: A default implementation of WldtLogger that prints log messages to the console.WldtDefaultLoggerFactory: A default implementation of WldtLoggerFactory that creates WldtDefaultLogger instances.The WldtLogger interface defines a set of methods for logging messages at different levels of severity.
Methods:
getName(): Returns the name of the logger, typically the fully qualified class name.trace(String msg), trace(String format, Object arg), trace(String format, Object arg1, Object arg2), trace(String format, Object... arguments), trace(String msg, Throwable t): Methods for logging trace level messages. These are typically fine-grained informational events that are most useful for debugging an application.isTraceEnabled(): Checks if the trace level is enabled.debug(String msg), debug(String format, Object arg), debug(String format, Object arg1, Object arg2), debug(String format, Object... arguments), debug(String msg, Throwable t): Methods for logging debug level messages. These are typically used for debugging purposes during development.isDebugEnabled(): Checks if the debug level is enabled.info(String msg), info(String format, Object arg), info(String format, Object arg1, Object arg2), info(String format, Object... arguments), info(String msg, Throwable t): Methods for logging info level messages. These provide general information about the application’s progress.isInfoEnabled(): Checks if the info level is enabled.warn(String msg), warn(String format, Object arg), warn(String format, Object arg1, Object arg2), warn(String format, Object... arguments), warn(String msg, Throwable t): Methods for logging warn level messages. These indicate potential issues or unexpected events that do not prevent the application from continuing.isWarnEnabled(): Checks if the warn level is enabled.error(String msg), error(String format, Object arg), error(String format, Object arg1, Object arg2), error(String format, Object... arguments), error(String msg, Throwable t): Methods for logging error level messages. These indicate serious problems that prevent the application from functioning correctly.isErrorEnabled(): Checks if the error level is enabled.The WldtLoggerFactory interface is responsible for creating instances of WldtLogger.
Method:
getLogger(Class<?> clazz): This method takes a Class<?> object as input and returns a WldtLogger instance associated with that class. This allows logs to be categorized by their source class.The WldtLoggerProvider acts as the entry point for obtaining logger instances.
Key Features:
WldtDefaultLoggerFactory to create WldtDefaultLogger instances.WldtLoggerFactory to integrate with different logging frameworks or implement custom logging behavior.Methods:
public static void setFactory(WldtLoggerFactory customFactory): Use this method to replace the default logger factory with your own custom implementation. This should typically be called once at the application’s startup.public static WldtLogger getLogger(Class<?> clazz): This static method is used to obtain a logger instance for a specific class. It delegates the logger creation to the currently set WldtLoggerFactory.The WldtDefaultLogger is a basic, console-based implementation of the WldtLogger interface.
Features:
System.out).The WldtDefaultLoggerFactory is the default factory implementation that creates WldtDefaultLogger instances.
Method:
public WldtLogger getLogger(Class<?> clazz): This method simply returns a new WldtDefaultLogger instance, initialized with the provided class.The WLDT logging layer is designed to be extensible, allowing developers to integrate their preferred logging frameworks (e.g., Log4j, SLF4j, Logback) or implement entirely custom logging logic.
To create a custom logger, you need to implement the WldtLogger interface. This allows you to define how log messages are handled (e.g., written to a file, sent to a remote server, or integrated with an existing logging framework).
Here’s an example of a MyCustomLogger that could integrate with a third-party logging framework:
package it.wldt.log;

import org.slf4j.Logger;
import org.slf4j.LoggerFactory;

public class MyCustomLogger implements WldtLogger {

    private final Logger slf4jLogger;
    public MyCustomLogger(Class<?> clazz) {        this.slf4jLogger = LoggerFactory.getLogger(clazz);    }
    @Override    public String getName() {        return slf4jLogger.getName();    }
    @Override    public void trace(String msg) {        slf4jLogger.trace(msg);    }
    @Override    public void trace(String format, Object arg) {        slf4jLogger.trace(format, arg);    }
    @Override    public void trace(String format, Object arg1, Object arg2) {        slf4jLogger.trace(format, arg1, arg2);    }
    @Override    public void trace(String format, Object... arguments) {        slf4jLogger.trace(format, arguments);    }
    @Override    public void trace(String msg, Throwable t) {        slf4jLogger.trace(msg, t);    }
    @Override    public boolean isTraceEnabled() {        return slf4jLogger.isTraceEnabled();    }
    @Override    public void debug(String msg) {        slf4jLogger.debug(msg);    }
    @Override    public void debug(String format, Object arg) {        slf4jLogger.debug(format, arg);    }
    @Override    public void debug(String format, Object arg1, Object arg2) {        slf4jLogger.debug(format, arg1, arg2);    }
    @Override    public void debug(String format, Object... arguments) {        slf4jLogger.debug(format, arguments);    }
    @Override    public void debug(String msg, Throwable t) {        slf4jLogger.debug(msg, t);    }
    @Override    public boolean isDebugEnabled() {        return slf4jLogger.isDebugEnabled();    }
    @Override    public void info(String msg) {        slf4jLogger.info(msg);    }
    @Override    public void info(String format, Object arg) {        slf4jLogger.info(format, arg);    }
    @Override    public void info(String format, Object arg1, Object arg2) {        slf4jLogger.info(format, arg1, arg2);    }
    @Override    public void info(String format, Object... arguments) {        slf4jLogger.info(format, arguments);    }
    @Override    public void info(String msg, Throwable t) {        slf4jLogger.info(msg, t);    }
    @Override    public boolean isInfoEnabled() {        return slf4jLogger.isInfoEnabled();    }
    @Override    public void warn(String msg) {        slf4jLogger.warn(msg);    }
    @Override    public void warn(String format, Object arg) {        slf4jLogger.warn(format, arg);    }
    @Override    public void warn(String format, Object arg1, Object arg2) {        slf4jLogger.warn(format, arg1, arg2);    }
    @Override    public void warn(String format, Object... arguments) {        slf4jLogger.warn(format, arguments);    }
    @Override    public void warn(String msg, Throwable t) {        slf4jLogger.warn(msg, t);    }
    @Override    public boolean isWarnEnabled() {        return slf4jLogger.isWarnEnabled();    }
    @Override    public void error(String msg) {        slf4jLogger.error(msg);    }
    @Override    public void error(String format, Object arg) {        slf4jLogger.error(format, arg);    }
    @Override    public void error(String format, Object arg1, Object arg2) {        slf4jLogger.error(format, arg1, arg2);    }
    @Override    public void error(String format, Object... arguments) {        slf4jLogger.error(format, arguments);    }
    @Override    public void error(String msg, Throwable t) {        slf4jLogger.error(msg, t);    }
    @Override    public boolean isErrorEnabled() {        return slf4jLogger.isErrorEnabled();    }}
Once you have your custom logger, you need a custom logger factory to provide instances of it.
This factory will implement the WldtLoggerFactory interface.
Here’s an example of a MyCustomLoggerFactory that produces MyCustomLogger instances:
package it.wldt.log;

public class MyCustomLoggerFactory implements WldtLoggerFactory {

    @Override    public WldtLogger getLogger(Class<?> clazz) {        return new MyCustomLogger(clazz);    }}
Finally, to use your custom logger and factory, you need to instruct the WldtLoggerProvider to use your MyCustomLoggerFactory.
This should be done once at the beginning of your application’s lifecycle, before any loggers are requested.
import it.wldt.log.WldtLoggerProvider;
import it.wldt.log.MyCustomLoggerFactory; // Your custom factory
import it.wldt.log.WldtLogger;

public class MyApplication {

    public static void main(String[] args) {        // Set the custom logger factory        WldtLoggerProvider.setFactory(new MyCustomLoggerFactory());
        // Now, any logger obtained will be an instance of MyCustomLogger        WldtLogger logger = WldtLoggerProvider.getLogger(MyApplication.class);        logger.info("This message will be logged using MyCustomLogger!");        logger.error("An error occurred!", new RuntimeException("Something went wrong"));    }}
By following these steps, you can seamlessly integrate custom logging solutions into your WLDT digital twin applications,
ensuring that your logging infrastructure meets your specific project requirements.